- Comics
-
Green Blog
Our Top Bloggers
Blogs By Topics


Tie Dye For (Part 2)


 Well, Teresa and I made 5 shirts last night and they are setting right now, so since I have so much time on my hands I figured I’d finish this blog.
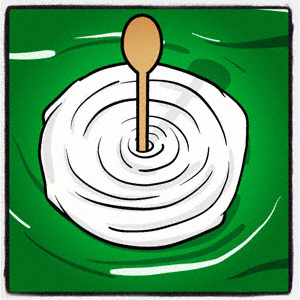
6. Making the “shirt pizza.” First lay the shirt out on a flat surface front side down if you want the sharper image to be on the front. (This is where the garbage bags come in handy to put down over the table so you don’t make a mess.) To make the swirl, use the handle of a wooden spoon and start twisting the shirt in one constant direction. Either clockwise or counter clockwise, whichever you prefer but make sure the shirt stays as flat as possible and doesn’t start climbing up the handle. in the middle. You must help the shirt to twist with your hands and not only spin it with the wooden spoon. Teresa showed me how you want everything to stay as flat and round-shaped as possible.
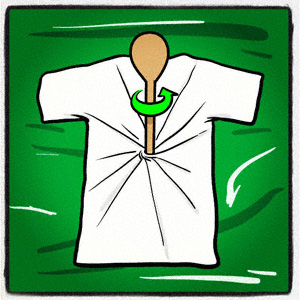
7. Now remove the spoon and carefully wrap the shirt pizza with rubber bands all around. Put a few on one side first then flip the shirt pizza over and do it from the other side as well. Throw 7 or 8 on there if you like, you’ll see how it affects the patterns. The t-shirt pizza should look something like the picture when you are done. See how nice and flat mine is? No major lumps or peaks anywhere just a nice constant folded swirl. You want those rubber bands to be fairly evenly distributed but it’s all about random as well and as you do more and more of these you will see how the way you make this pizza is how the pattern turns out.
8. Dying the pizza. This part is easy and really not all that messy if you follow a few of these tricks here. Cut out a round piece of cardboard to use as a pie plate for your shirt pizza and you can flip it over easier to do the other side. Work on top of your plastic covered table so you don’t dye anything else. Dye will stain absolutely everything so be careful and wear those gloves. When you put the dye on the shirt, imagine a pie chart with the 3 basic colours I told you to buy, you are going to apply the colours in the same way on both sides of the pie, red on top of red, yellow on top of yellow, where the colours overlap is where you will see the rainbow effect. The white part is hidden within the folds and will stay white. Carefully apply the colours starting with yellow and working from the centre of the pizza out towards the outer edge. Hold the bottle of dye close to the shirt and make sure you don’t leave any white showing as you colour in each part of your pie chart. Remember overlap is good! Now flip it over onto another cardboard pie plate and do the same on the other side.
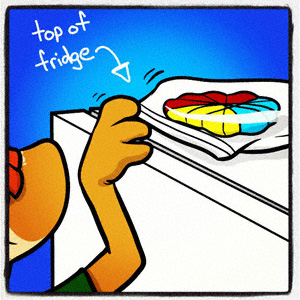
9. Setting the dye. Gramma says all good things come to those who wait and says you must let that dye set into the fabric for at least 24 and up to 36 hours! It is a long time to wait but it’s for the best if you want your colours to last. Put your dyed pizza in a zippered plastic bag and seal it up tight. Put it in a warm place like on top of the fridge and forget about it for at LEAST 24 hours.
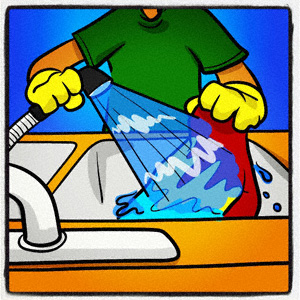
10. Rinse, Wash and Enjoy! Finally the fun part, put your rubber gloves on again, take the shirt out of the bag, take the rubber bands off and rinse all the excess dye out of the fabric with cold water in the sink. Don’t worry about all that dye that will come out of the shirt, in fact the water will turn black but keep rinsing until its all gone and you will see how your rainbow swirl will start to appear. Make sure you wash that shirt separately a few times before trusting it with other clothes in the wash but after one wash it should be ready to wear, so enjoy!
Blog Category:
RRR
Blog Group:
DIY