- Comics
-
Green Blog
Our Top Bloggers
Blogs By Topics


Gardening With Milk Jugs
 Over the winter I had been rescuing all of the 4-liter milk jugs from the recycling bin. Recycling is a great thing to do with milk jugs of course, but I just couldn’t pass up on the opportunity to have plenty of useful plastic containers to help me with my gardening this spring, and all for free! Let me pass some on my ideas on to you and see you find them useful too.
Plant right in those containers. You can cut the bottoms off and use those as seeding trays. I’ve been planning on getting some seeds germinating right away so when the weather starts getting warm enough to put plants out, I’ll have a nice start on bedding plants.


The top halves of that wonderful container are even more useful. Aside from the obvious, take the lid off and use it like a funnel, one idea that came to mind was using the handle of the milk jug as the handle for a garden scoop or a dust pan. I mean it’s right there! You just have to visualize how to cut it and may need a few tries but with a little practice you will get a couple of different styled tools that are bound to come in handy from time to time.
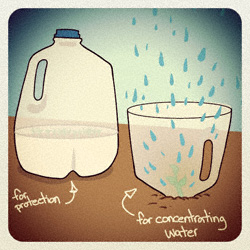
Those tops are also handy for using as covers on my delicate seedlings for those first few weeks when they are vulnerable to the cool nights and the odd meandering Jackrabbit. You can also cut the top part and the bottom part off and use it as a plant sleeve in the garden for concentrating water and deterring slugs.

Something I may end up doing this spring is making garden tags, if I still have jugs left over or scraps. Pretty straight forward really - you just make yourself a stencil of the shape you want. I just used one of the tags that came in some bedding plants from last year and traced them out all along the sides of a one-litre jug. You can write on them easy enough with a jiffy marker and they are sturdy enough to hold themselves up and be pushed into the soil. You can also make plant ties by cutting one end like an arrow and cutting a slit in the other end.
Why not leave the jugs exactly as they were made and make great use of them with little or no modification? Well, for starters you can drill or use a hot finishing nail to poke a bunch of holes in the lid of the jug and there you have a watering can. You could just pop the lid off and put it on a full one instead of refilling the jug.


The real reason I saved all those containers this past winter is for upside down tomato planters. Just cut the bottom of the jug off, turn it upside down and fill with dirt and poke a little hole in the dirt through the spout hole and slip in a little tomato plant. My Sweetheart told me about her friend’s husband doing the same thing with the jugs but he hangs them up by their handle and plants on the bottom of the jug by making a small hole in the bottom. That way apparently, he can place a 2 litre pop bottle full of water upside down into the spout on top of that for slow watering. I’m not sure how he rigged it, but can’t be too complicated. I’m just anxious to see just how well this upside down tomato method really is!
Blog Category:
RRR
Yard & Garden
Blog Group:
DIY