- Comics
-
Green Blog
Our Top Bloggers
Blogs By Topics


Repairing A Leaky Tap

Last week I found that the darn downstairs bathtub tap was dripping. You know what that means! Money is going down the drain! It is an older tap but still looks good so I decided to fix it instead of replacing it.
Here is how I did it. First, I got the tools that I would be needing together. I needed a phillips screwdriver, a seat tool and a crescent wrench. I turned off the water to the bath tub, both hot and cold, that way I won't get real wet real fast when I take the tap apart. Then I opened both taps all the way. This is important for putting things back together.


Next I used the edge of my pocket knife to gently pry the center cover off of the tap handle. That's the round part that has H or C on it.
Under that cap is a phillips screw that holds the handle of the tap on. Take that screw out and gently wiggle the handle off.


Now you can see the valve stem.

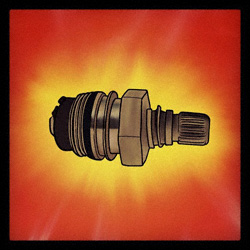
I used a crescent wrench to unscrew the valve stem out of the valve body. Now we are getting to the fun part!


If you look at the inside of the valve stem you will see what is left of the old rubber washer, It is held in place with another phillips screw.
Take that screw out and remove the rubber washer. If you look close you will see a size imprinted into the washer, this will help getting replacements.
Sometimes just replacing that washer and putting the valve stem back into the valve body is enough to stop the leaking but most of the time it is necessary to replace the seat as well.


The seat is a brass fitting that is threaded into the back of the valve body. It is hard to see without a flashlight. To change the seat you do need a special tool called... You guessed it ... A seat tool. It is a very simple tool, cheap to buy at the same place you will get your replacement parts. The end of the tool goes into the center of the seat and simply threads it out counter clockwise.


When the old seat is out it can be matched for replacement.
So now you have in hand the old seat and old washer. Take them to the D.I.Y.S store and match them up with the correct replacements.
Putting it back together is easy.
First is the new seat. Just put the new seat onto the same end of the seat tool that you used to remove the old one, carefully thread it into the valve body (turn clockwise). Don't over tighten the seat! It’s best just to "bottom" it then go about 1/2 to 3/4 turn more. Don't force anything.
Next put the screw through the center hole of the new rubber washer and screw it onto the the end of the valve stem. Thread the valve stem back into the valve body, again, don't over-tighten it.
Now you can put the handle back onto the spline and replace the other screw in the center of the handle.
Replace the small center cover, make sure to get H&C on the right sides. (H goes on the left.)
Close the taps and turn the water back on. You are done and your Queen will think you are a genius!
Blog Category:
Water
Blog Group:
DIY